今天来说一下 Spring boot 如何集成 Swagger 2,虽然网上有很多这样的教程,但觉得还是应该自己梳理一下,这样对知识的掌握比较牢靠。另外文章中也有我在开发中遇到的问题及解决方法,统一记录下来。

真的比 postman 省心,对于前后端联调、测试、用户来说都很便利。可惜就是代码侵入性太强~ 暂时忍耐。

一、集成 Swagger 2

1、添加 pom.xml 文件依赖

1
2
3
4
5
6
7
8
9
10
11
12
13
14
15
16
17
18
19
20
21
<!-- swagger ui -->
<dependency>
<groupId>io.springfox</groupId>
<artifactId>springfox-swagger2</artifactId>
<version>2.9.2</version>
</dependency>
<dependency>
<groupId>io.springfox</groupId>
<artifactId>springfox-swagger-ui</artifactId>
<version>2.9.2</version>
</dependency>
<dependency>
<groupId>io.swagger</groupId>
<artifactId>swagger-annotations</artifactId>
<version>1.5.22</version>
</dependency>
<dependency>
<groupId>io.swagger</groupId>
<artifactId>swagger-models</artifactId>
<version>1.5.22</version>
</dependency>

曾经有一个 spring cloud 项目,用到的 spring boot 版本是 1.x, 用了上述的 2.9.2 版本,添加了 @EnableSwagger2 后,项目启动失败。将版本降低到 2.8.0 后,项目运行正常。测试发现,后两个依赖也可以不用。

2、添加 Swagger java 配置

1
2
3
4
5
6
7
8
9
10
11
12
13
14
15
16
17
18
19
20
21
22
23
24
25
26
27
28
29
30
31
32
33
34
35
36
37
38
39
40
41
42
43
44
45
46
47
48
49
50
51
52
53
54
55
56
57
58
59
60
61
62
63
64
65
66
67
68
69
70
71
72
73
74
75
76
77
78
79
80
81
82
83
84
package com.xxx.xxx.config;

import org.springframework.context.annotation.Bean;
import org.springframework.context.annotation.Configuration;
import org.springframework.web.servlet.config.annotation.ResourceHandlerRegistry;
import org.springframework.web.servlet.config.annotation.WebMvcConfigurationSupport;
import springfox.documentation.builders.ApiInfoBuilder;
import springfox.documentation.builders.PathSelectors;
import springfox.documentation.builders.RequestHandlerSelectors;
import springfox.documentation.service.ApiInfo;
import springfox.documentation.spi.DocumentationType;
import springfox.documentation.spring.web.plugins.Docket;
import springfox.documentation.swagger.web.*;
import springfox.documentation.swagger2.annotations.EnableSwagger2;

/**
* @author create17
* @date 2020/6/3
*/
@Configuration
@EnableSwagger2
public class SwaggerConfig extends WebMvcConfigurationSupport {
@Bean
public Docket createRestApi() {
return new Docket(DocumentationType.SWAGGER_2)
.apiInfo(apiInfo())
.select()
.apis(RequestHandlerSelectors.basePackage("com.xxx.xxx.controller"))
.paths(PathSelectors.any())
.build();
}

/**
* 隐藏UI上的Models模块
*/
@Bean
public UiConfiguration uiConfig() {
return UiConfigurationBuilder.builder()
.deepLinking(true)
.displayOperationId(false)
// 隐藏UI上的Models模块
.defaultModelsExpandDepth(-1)
.defaultModelExpandDepth(0)
.defaultModelRendering(ModelRendering.EXAMPLE)
.displayRequestDuration(false)
.docExpansion(DocExpansion.NONE)
.filter(false)
.maxDisplayedTags(null)
.operationsSorter(OperationsSorter.ALPHA)
.showExtensions(false)
.tagsSorter(TagsSorter.ALPHA)
.validatorUrl(null)
.build();
}

private ApiInfo apiInfo() {
return new ApiInfoBuilder()
.title("访问clientid管理、元数据管理、日志管理")
// .description("")
// .version("1.0")
// .contact(new Contact("","",""))
// .license("")
// .licenseUrl("")
.build();
}

/**
* 防止@EnableMvc把默认的静态资源路径覆盖了,手动设置的方式
*
* @param registry
*/
@Override
public void addResourceHandlers(ResourceHandlerRegistry registry) {
// 解决静态资源无法访问
registry.addResourceHandler("/**")
.addResourceLocations("classpath:/static/");
// 解决swagger无法访问
registry.addResourceHandler("/swagger-ui.html")
.addResourceLocations("classpath:/META-INF/resources/");
// 解决swagger的js文件无法访问
registry.addResourceHandler("/webjars/**")
.addResourceLocations("classpath:/META-INF/resources/webjars/");
}
}

分析上述配置,我们需要在 java 类上指明 @Configuration、@EnableSwagger2 注解。

另外还需要指定 controller 的包路径。如果需要隐藏 Swagger ui 上的 Models 模块,则需要上面的 uiConfig() 方法。

为了防止 @EnableMvc 把默认的静态资源路径覆盖,还需要上面的 addResourceHandlers() 方法。

紧接着,我们就可以启动项目了,Swagger 2 ui 地址为:http://ip:port/swagger-ui.html

二、Swagger 常用注解

  • @Api(tags = “xxx相关接口”) :修饰整个类,描述 Controller 的作用。
  • @ApiOperation(“xxxx”) :描述 api 接口方法。
  • @ApiModel(“访问clientid表”) :当 @RequestParam 参数多的时候,可以用对象来接收参数,通常用在 @RequestBody 的 对象 内。注意:@ApiModel 的 value 值需要保持唯一,否则会出现覆盖的情况。
  • @ApiModelProperty(value = “主键”, required = true, hidden = true) :用对象接收参数时,描述 Model 对象的一个字段,也称为属性。
  • @ApiIgnore:用于 controller 层、controller 层方法、controller 层方法参数上,表示被 swagger ui 忽略。
  • @ApiParam(name = “”, required = true, value = “clientid ID”, hidden = true) :可用于描述单个参数,或者描述 @RequestBody 对象。
    • name 为页面上的 Name
    • value 为页面上的 Description
  • @ApiImplicitParams({
            @ApiImplicitParam(name = "name", value = "clientid名称"),
            @ApiImplicitParam(name = "clientid", value = "clientid编码"),
            @ApiImplicitParam(name = "description", value = "clientid描述信息")
    }) :适用于 @RequestParam 参数少的时候,参数多的时候可以用 @ApiModel 和 @ApiModelProperty 。
    

参考博客:https://www.cnblogs.com/fengli9998/p/7921601.html

三、个人小结

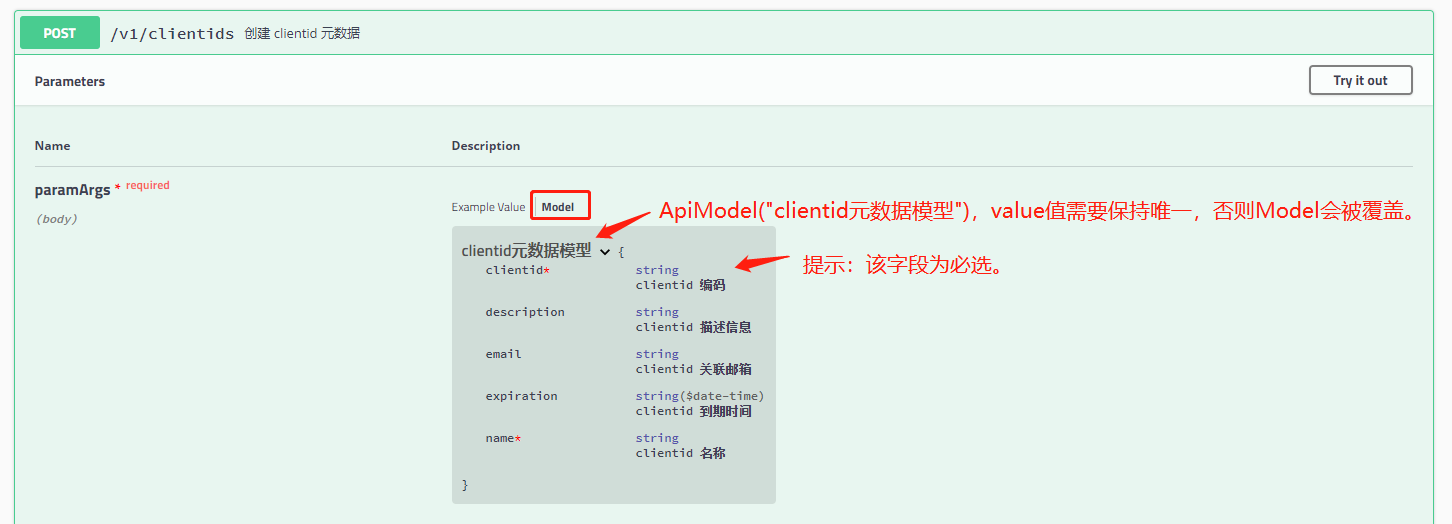
1、Swagger ui 页面上的 body 里面的 Model

注解 @ApiModel 和 @ApiModelProperty 是作用在 javaBean 上的,可以起解释说明,是否必选,是否隐藏的作用。在 swagger-ui 页面上的体现形式如下图所示:

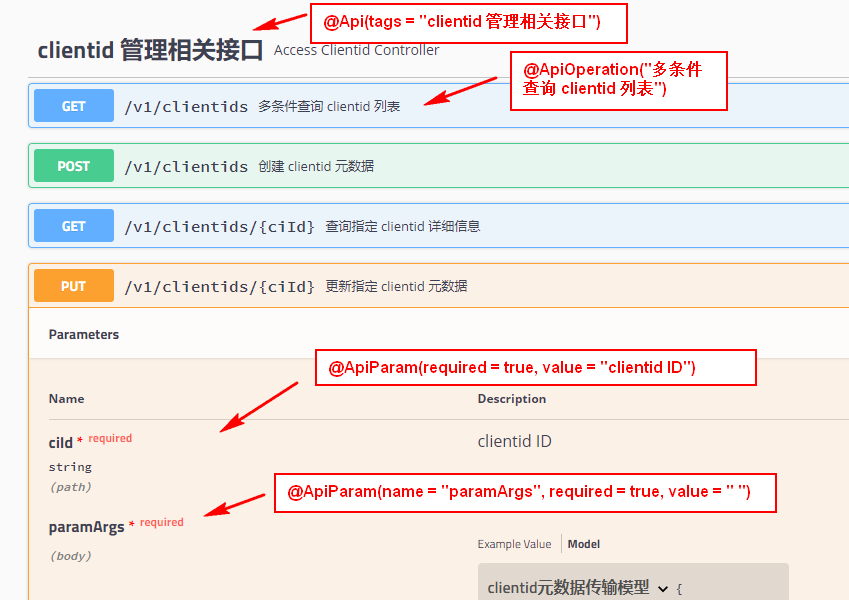
2、controller 层 swagger 相关注解

@Api、@ApiOperation、@ApiParam、@ApiIgnore、@ApiImplicitParams 都是作用在 controller 层的注解。如下图所示:

3、PO、DTO、VO 说明及使用

  • PO(Persistant Object) 持久对象,用于表示数据库中的一条记录映射成的 java 对象,可以理解一个 PO 就是数据库中的一条记录;
  • DTO(Data Transfer Object)数据传输对象,前端调用时传输。
  • VO(Value Object)表现对象,用于表示一个与前端进行交互的 java 对象,只包含前端需要展示的数据。

关于 java 中常见的对象类型简述(DO、BO、DTO、VO、AO、PO)可参考:https://blog.csdn.net/uestcyms/article/details/80244407

当有多个 requestparam 参数的时候,我们用 DTO 对象接收参数比较方便,用 DTO 对象来精准无冗余地接收请求参数。

可能这里有朋友会疑问,为什么不用 PO 来接收请求参数呢?

因为 PO 中可能存在冗余字段,如果用 PO 来接收参数的话,冗余字段也会在 Swagger ui 页面上显示,用户体验并不好,所以我们用 DTO 来接收请求参数。

同理,为了避免返回给前端的数据存在冗余字段(即不需要展示的字段),我们可以使用 VO 来接收数据返回给前端进行交互。


点关注,不迷路

好了各位,以上就是这篇文章的全部内容了,能看到这里的人呀,都是人才

白嫖不好,创作不易。 各位的支持和认可,就是我创作的最大动力,我们下篇文章见!

如果本篇博客有任何错误,请批评指教,不胜感激 !